Auto Events, Shop Projects,Car Builds, Product Reviews
Part 04 – Brake System
Calipers and Rotors
Prior to painting the front end , I had removed the calipers, brake hoses, brake lines and rotors. Now it was time to reverse the procedure. First thing I did was dismantle the calipers and clean everything. I removed the pistons from the calipers, luck was with me and they were in very good condition- the cylinder walls were good – the piston sides were also in good condition and the seals were good. In case you are wondering how to get the pistons out is really very simple. Remove the brake hose from the caliper, make sure the bleed screw is closed and using compressed air apply to the brake hose port. The piston will come out with great force so keep your fingers out of the way. This is the voice of experience speaking.
 |
 |
 |
 |
With everything clean (especially the cylinder and piston) apply a little brake fluid to the sides of the piston and push it back into place. There is very close tolerances so a lot of pressure is required. I use an appropriate size of wood that will fit inside the piston and gently tap it into place ( keep the piston as square as you can otherwise they can jam and then you do have a problem). With the brake hose and bleed screw port plugged, I then painted the outside of the calipers.
The rotors were fairly straight forward and in reasonable condition. I painted the outside and inside of the hub, repacked the wheel bearings and then mounted on to the spindles.
New brake pads were installed and the calipers reinstalled. New brake hoses were purchased and installed and the open end plugged so no dirt can enter the system. New brake lines have to be installed but I will do that after I have finished painting the frame and doing the rear brakes and shocks.
New front shocks had been purchased and were installed. Previously, I had cleaned the brake splitter and lines (from the master cylinder) and now mounted it to the frame. Also the power steering gear box had been cleaned and painted and was reinstalled.
All in all the front has come back together nicely.
From the scrap yard 58, I was able to salvage the required hardware ( springs, clips, brake shoe adjusters, etc.) as well as the emergency brake mechanism . After removing, cleaning on the bench wire wheel and immersing in rust remover for a few days the parts came up good and useable. I was able to obtain new brake shoes, new rear wheel cylinders and shocks from a local supplier. Things went together as they should .
 |
 |
 |
 |
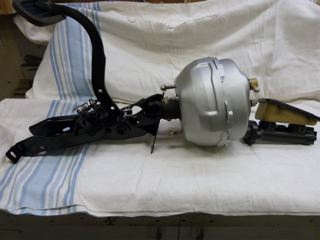
I now moved up the firewall to the mounting for the original brake master cylinder. The original was a single stage design and was flush with the firewall. This had to be changed as the new unit consists of a vacuum booster and a dual stage master cylinder and sits at an angle so that the reservoir will be level. Having cut the opening at an angle I then had to modify the brake pedal bracket. A new cover plate was cut from sheet metal with the plasma cutter and welded into place. New mounting brackets were cut , drilled and welded to the main brake pedal bracket
 |
 |
 |
 |
I then did a trial fit of the units , bolted in place and brake lines attached. Units dismantled, painted and put in storage. The Chevy now has power brakes with a new dual stage master brake cylinder.
 |
 |
Share this:


